
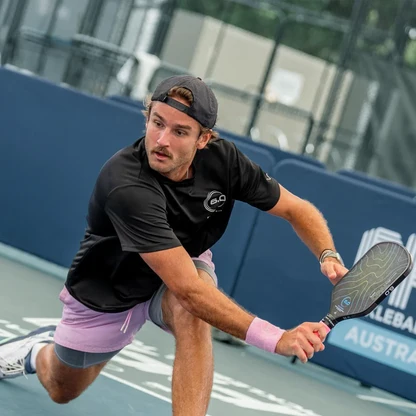
Is “Pickleball Fitness” a real thing? Well, we have all seen it or experienced it at one point. You step onto the court and one awkward move, and pop. There goes a calf, a knee, or a lower back.
While pickleball is often celebrated as an accessible sport, it is actually a high-speed, multi-directional game. It’s packed with explosive deceleration, deep lunges, and rapid rotation. If you do not have the baseline strength, core stability, and joint mobility required, your body eventually pays the price.
Before you grab your paddle for your next match, take 10 minutes to assess your pickleball fitness. Doing so may prevent common pickleball injuries. Ready to get started, see how many you can actually pass.
1: The Kitchen Line Burner Exercise (Wall Sit)
- The Goal: Hold a wall sit for 60 seconds.
- The Form: Thighs parallel to the ground, back flat against the wall.
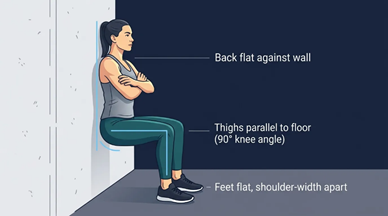
- The Verdict: If your legs start shaking before 30 seconds, your leg muscles aren’t strong enough yet. That means it’ll be hard to hold a low, ready position during long rallies at the kitchen line.
- The Fix: While on the court, you’ll spend the majority of your playing time with your needs slightly bent. This is also an important pickleball fitness aspect you must improve on. Practice holding wall sits 3 times a week, working up in 10-second increments as you get stronger. Start with 3 sets of however long you can hold it (even 15-20 seconds), resting a minute between sets. Add bodyweight squats and lunges to your workouts. They build the same leg endurance you need to stay low at the kitchen line.
2: The Ankle Armor Test (Single-Leg Balance Exercise)
- The Goal: Stand on one leg, eyes closed, for 30 seconds.
- The Form: From a standing position, lift your right leg a few inches off the ground. Then close your eyes and hold that for 30 seconds. Repeat this with your left leg.
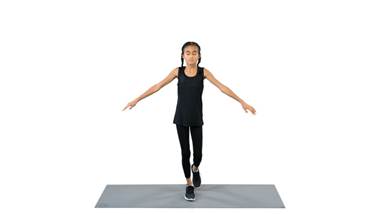
- The Verdict: This is one of the most accurate predictors of ankle and knee injury on the court. Unbelievably, most recreational players cannot make it past 10 seconds. If you wobble and drop, your joint stabilizers are sleeping on the job, increasing your risk of an ankle sprain.
- The Fix: Practice single-leg balance daily. Start with eyes open for 30 seconds per leg, then progress to eyes closed once that feels easy. To make it harder, try standing on a pillow or a folded towel. This forces your ankle stabilizers to work even more. A few minutes a day while brushing your teeth is an easy way to sneak this in.
3: The Wide-Ball Chase (Shuffle Steps – Let’s Get Physical)
- The Goal: Complete 5 or more lateral shuffles in under 5 seconds.
- The Form: Start in an athletic ready stance — knees bent, feet shoulder-width apart, weight on the balls of your feet. Shuffle sideways using short, quick steps without crossing your feet or letting them click together. Keep your hips low and your chest up the whole time, then reverse direction and shuffle back.
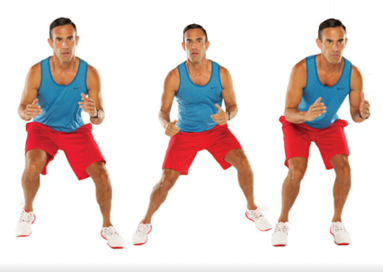
- The Verdict: This is one of the most important pickleball fitness tests. Lateral movement in pickleball is extremely important. Watch your form. If your feet are crossing or your hips are rising as you move, your lateral speed is costing you points. This is also putting your knees out of alignment every single game.
- The Fix: Slow the movement down first. Practice shuffling with perfect form (low hips, no crossover, no clicking feet) before adding speed. Set up two cones about 5 feet apart and shuffle between them. Focusing on quick, controlled steps rather than big lunging ones. Once your form is clean, gradually pick up the pace.
4: The Low-Dink Reach (Toe-Touch)
- The Goal: Touch your toes with your knees perfectly straight.
- The Form: Standing straight with your hands to your side, bend at the waist and touch your toes.
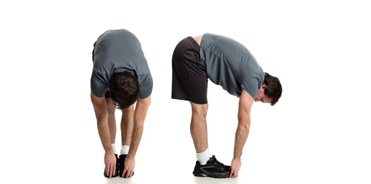
- The Verdict: If your fingertips cannot get past your shins, your tight hamstrings are pulling directly on your lower back every single time you bend down to retrieve a low shot.
- The Fix: Stretch your hamstrings 3-4 times a week — hold a standing or seated toe-touch stretch for 20-30 seconds, breathing through it rather than bouncing. Consistency matters more than intensity here; a little bit most days will loosen tight hamstrings faster than one long stretch session a week.
5: The Shock Absorber (Bodyweight Squats)
- The Goal: Complete 10 bodyweight squats below parallel.
- The Form: Keep your heels glued to the floor and make sure your knees do not cave inward.
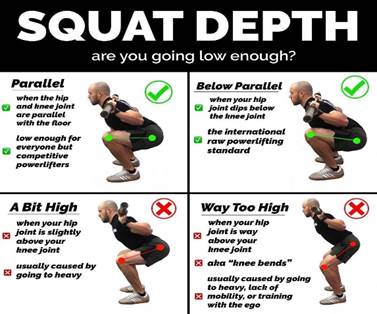
- The Verdict: If you cannot hit depth cleanly, your knee and hip joints are absorbing harsh impacts that your lower body muscles should be overseeing.
- The Fix: Practice bodyweight squats in front of a mirror, focusing on sitting back like you’re lowering into a chair while keeping your knees tracking over your toes (not caving in). Go slow — 3 seconds down, pause, 3 seconds up — to build control before adding speed. Doing 3 sets of 10, a few times a week, will build the strength your joints need to absorb impact safely.
6: The Overhead Smash Check (Overhead Wall Reach)
- The Goal: Stand back to the wall and reach both arms straight overhead.
- The Form: Keep your wrists and arms touching the wall without letting your lower back peel off the surface.
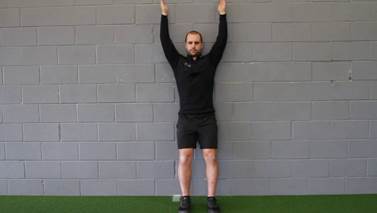
- The Verdict: If your back arches to get your arms up, your tight thoracic spine (upper back) is severely limiting your overhead smash power and putting your rotator cuff at risk.
- The Fix: Stretch your upper back and chest a few times a week — try wall angels (sliding your arms up and down the wall like a snow angel) and doorway chest stretches to loosen up your thoracic spine. Practicing the overhead wall reach itself, holding for 20-30 seconds without letting your back arch, will also help you build that overhead mobility over time.
7: The Achilles Shield (Single-Leg Calf Raises)
- The Goal: Do 5 single-leg calf raises on each side.
The Form: Stand on one leg, holding onto a chair or wall for balance. Keeping your leg straight, slowly rise up onto your toes as high as you can, then lower back down with control until your heel is close to the ground. Keep your weight centered over the ball of your foot the whole time, anddon’t let your ankle roll in or out.
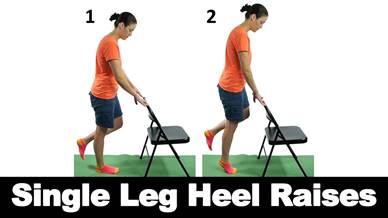
- The Verdict: If you are wobbling, rushing, or using momentum, your calf muscles and Achilles tendons are not prepared for the explosive, stop-and-go demands of competitive play.
- The Fix: Practice single-leg calf raises 2-3 times a week, holding onto a wall or chair for balance if needed. Focus on rising all the way up onto your toes and lowering all the way back down slowly — no bouncing or rushing. As they get easier, add more reps before trying them without holding on for support.
8: The Backhand Pivot (Standing Rotation)
- The Goal: Rotate your upper body 90 degrees in each direction while standing.
- The Form: Stand with your feet shoulder-width apart, facing straight ahead, and keep them planted the entire time. Cross your arms over your chest, then rotate your upper body as far as you can to the right, using your core and upper back rather than your hips. Return to center, then repeat rotating to the left.
- The Verdict: If you cannot hit a clean 90-degree turn, your limited spinal rotation is choking your backhand power and slowing down your reaction time on wide balls.
- The Fix: Practice standing rotations daily, keeping your feet planted and turning from your core and upper back rather than your hips. Try holding a broomstick or towel across your shoulders and rotating side to side — it helps you feel the correct movement and keeps your form honest. Foam rolling or stretching your mid-back a few times a week can also help free up that rotation.
9: The Split-Step Reset (Rapid Split Steps)
- The Goal: Perform 10 split steps in under 8 seconds.
- The Form: Start in an athletic ready stance — knees slightly bent, weight on the balls of your feet. Hop both feet slightly off the ground and land softly with your feet just outside shoulder-width, ready to explode in any direction. Reset back to your starting stance and repeat, keeping each landing quiet and controlled.
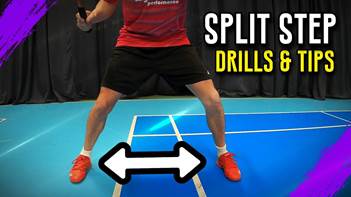
- The Verdict: If your split step is slow, heavy, or loud, your court agility will suffer. This will result in you being a fraction of a second too late to make a play on the ball.
- The Fix: Start slowly and practice split steps in place, focusing on landing soft and quiet on the balls of your feet before worrying about speed. Once your landings are consistently quiet, gradually increase your pace until you can do 10 in under 8 seconds. Jump rope is also a great way to build the quick, light footwork this test measures.
How Did You Score on the Pickleball Fitness Test?
Be honest. How many of these did you actually pass with perfect form? Pickleball fitness should not be taken lightly. Always take time to stretch and warm up before playing. Taking a few minutes a week to exercise is worth it.
Most players fail at least three of these baseline exercises. If you failed some, do not worry. Identifying these weak links is the absolute best way to improve your pickleball performance. It will also improve your overall pickleball fitness and help you play pain-free for years to come.
Want to patch the leaks in your movement and boost your court agility? Start by working with a pickleball professional to learn proper technique. For private lessons or group lesson opportunities visit or webpage: Pickleball Lessons – SCC Pickleball or contact us at: info@sccpickleball.com. We at SCC Pickleball, follow and trust @reece.maranda. Dr. Reece Maranda helps pickleball players manage aches, avoid injuries, and play longer. You can also visit his website at On the Move Therapy & Wellness.